
On a recent trip to my local Princess Auto to buy an angle grinder, the store just happened to have a temporary scratch and dent stand set up in the parking lot by the front door, clearing out some not-quite-good-as-new merchandise. An angle grinder sitting on a table in that display caught my eye. Just exactly what I’m in the market for, I thought. But why is it out here? What’s wrong with it?
“It sorta worked for a second or so when we plugged it in,” the clerk on duty said of the tool that appeared to have been returned by a customer for a refund, or some similar situation.
For five bucks I could take a flyer on it and see if I could revive it. “If nothing else you’ll have a good heavy-duty power cord,” the clerk added, in the event it turned out to be suffering from some sort of stage four terminal illness. He didn’t sound too confident it would live again.
Read Also

Fendt reintroduces 800 Vario Series line of tractors
Agco’s Fendt arm has reintroduced a new and improved Gen5 800 Vario Series of tractors to the North American market.
Nevertheless, challenge accepted. I pulled out a fiver and took the grinder home. (I also bought a new one, just in case all I really did have so far was just a good power cord.)
Back in my garage, I plugged it in. The clerk was right: it was lifeless. So it was time to dig into it and diagnose the problem. Following logical steps, it’s possible to track down the fault.
The first step was to remove a few screws in the handle to expose the trigger switch and see if it functioned, allowing power to flow to the motor.
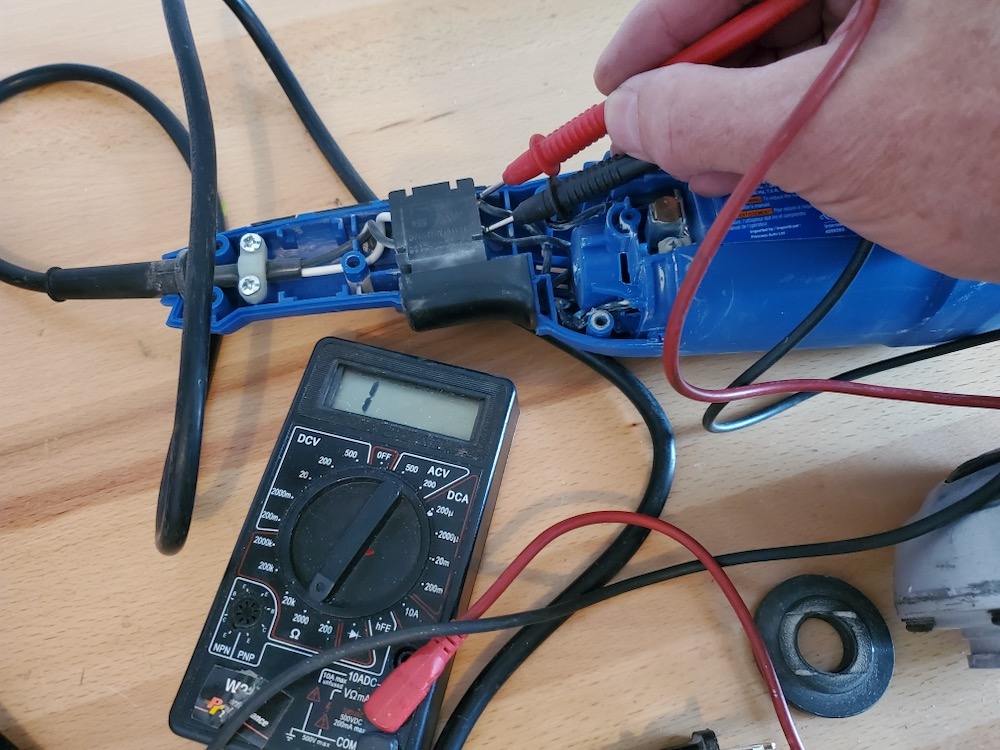
A simple test with a multimeter can determine that. Attach one lead to the power-in side on the switch, and the second to the power-out terminal. With the multimeter set to test for resistance and continuity, it should show an “open” circuit with the switch off. It did.
With the trigger pulled and the switch closed it showed continuity — meaning, basically, that it worked.
READ MORE: How to check for a faulty relay
Electrical current needs to flow in a closed circuit from positive to negative to make anything function. Think of it like a pasture fence. If the gate is open, the fence is incomplete. If the gate is closed, it completes the fence, just like an electrical circuit; the switch must be closed to make the connection and allow current to flow. Pulling the trigger closes the switch to allow power to flow.
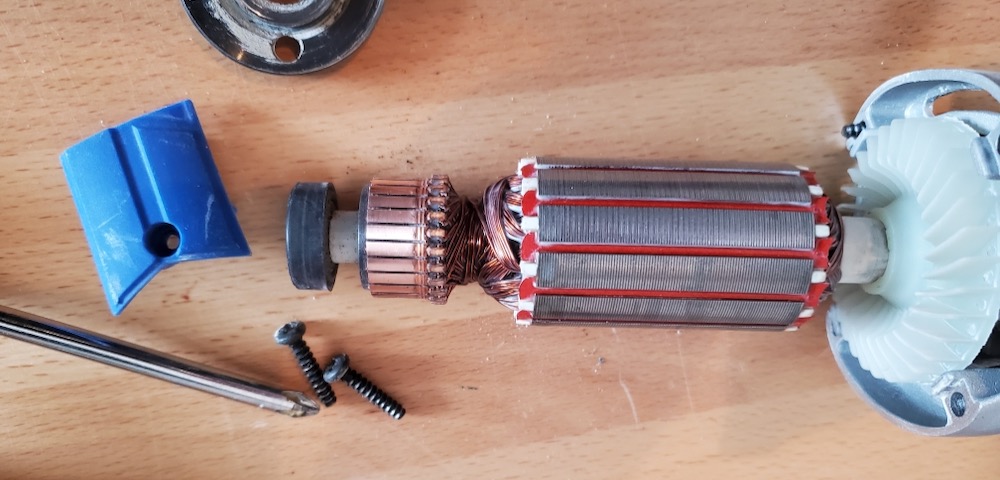
So I now knew the switch worked fine, and I could see all the connections from it to the brushes appeared to be in good order with no obvious problems. The next step is to pull the armature and see what’s going on inside the motor. Why isn’t it turning, because it’s getting electricity?
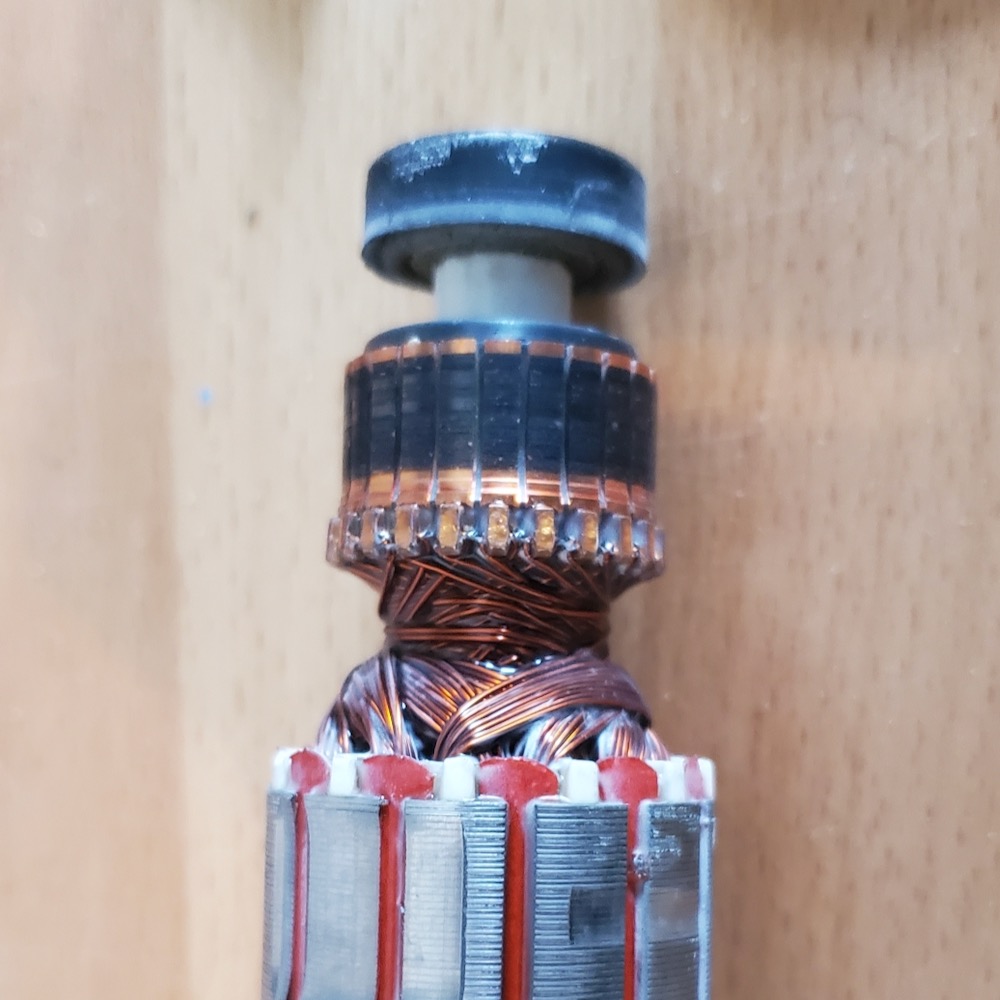
Removing four screws allows the geared end of the grinder to be removed. It’s connected to the armature. As soon as the armature is removed, there is an obvious indication of a problem. The commutator segments on the end of the armature shaft are coated with carbon buildup. It has a solid black carbon ring around it where the brushes ride. It should have a nice shiny copper appearance.
Here’s why that’s important.
The commutator has several individual segments, each connected only to the segment on the opposite side of the armature shaft. That connection allows electricity to flow from the brush it contacts on one side of the shaft to the brush in contact with the opposite commutator segment on the other side of the armature shaft.
Remember, electricity needs to complete a circuit. The two brushes in contact with two segments of the commutator allow electricity to flow across the shaft and help create the magnetic field that spins the armature.
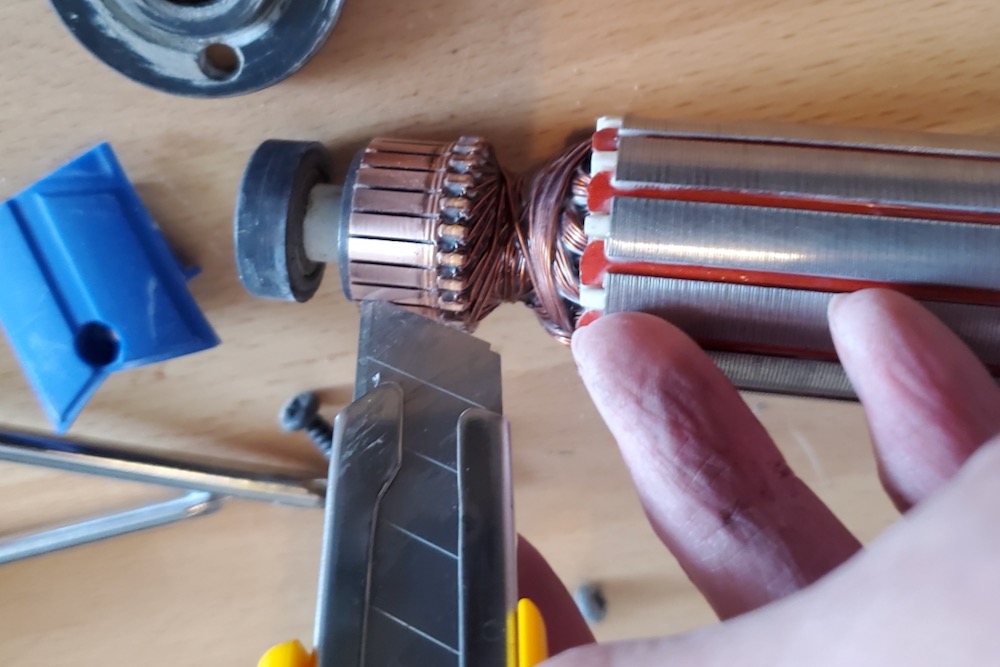
If the carbon buildup allows for current to jump between other segments, it essentially creates a short circuit and can cause excessive sparking. So the first step in repairing the grinder is to clean the commutator.
Some 800-grit sandpaper, lightly scuffed across the commutator segments, removes the carbon buildup — and a final once-over with 2000-grit polishes and smooths the segments. Using the back side of an Exacto knife, the carbon is cleaned out from between the segments to ensure electrical current won’t jump between them.
But there was another problem. Looking into the motor with the armature removed, only one brush was visible. Each brush is held against the commutator with a small spring to keep it in contact with the segments. With the armature removed, the springs should be pushing each brush out into the space where the commutator was.
“Brush” is a bit of a misnomer, because they are really just solid blocks of carbon graphite.
Pulling the brushes out of the grinder is simply a matter of removing the cover over each one. The missing brush was stuck in its housing, a metal channel that allows it to move freely toward the commutator as it wears. It was heavily coated with carbon powder which appeared to jam it in place, preventing it from contacting the commutator.
Brushes slowly wear over time, so the spring is important to keep them in contact with the commutator as they wear down. When they’ve worn down too much they can be replaced. With the original brush cleaned up and reinserted, it was clear it could now slide easily in its housing and function properly.
To reinstall the armature, both brushes are removed to allow the armature to slide back into place. Once it’s in, the brushes can be reinstalled.
With reassembly complete, it was time to see if the $5 investment was going to pay off. And it did. The grinder eagerly spun to life. A few days later it was put to work cutting sheet metal to repair some rust spots on a pickup truck. It performed flawlessly.
Total investment: $5 cash, two pieces of sandpaper and 20 minutes work.