My oven finally surrendered after 15 years of hard use. It was traumatic for me — losing a trusted tool is a shock for any serious cook. After much debate and research, the new range was installed last month. I am getting to know it. That, too, is traumatic.
The fact is, frequent usage shortens the life of an oven, by which I mean the modern generation of ovens that have electronic and computerized motherboards and ignition systems. My grandmother’s cast-iron wood-burning stove with the water reservoir would have never worn out — no moving parts, no smart tech, no persnickety electronic ignition. But today’s ranges offer a wide variety of settings — some of which seem useful, some of which mimic self-built hacks I’ve utilized over decades of baking.
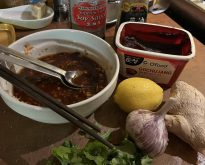
Dave and I discussed switching from natural gas to an electrically powered induction cooktop and electric oven. I’ve used gas most of my adult life, as a dedicated home cook and as a professional chef and baker. But reports from Scientific American and Consumer Reports show induction is more efficient and safer than gas, citing some increased risk of asthma, due to nitrogen dioxide emissions, in children residing in homes with natural gas stoves. (Using a high-efficiency range hood that is vented to the outdoors every time you light a burner reduces, but does not eliminate, the risk.) Other issues are the threat of fire, risk of gas leaking from a burner if it gutters out, and carbon dioxide emissions.
Read Also

Is the technology in our vehicles a help or a hindrance?
Not only does new tech allow people to operate vehicles and farm machinery with fewer skills, it also creates more problems for vehicle users when those systems fail, Scott Garvey writes.
Despite pushback from Asian cooks and chefs, who say induction cannot heat woks sufficiently and interferes with culturally appropriate cooking, some Canadian and U.S. cities have banned or are considering banning installation of gas-powered appliances in new buildings.
My sister bought an induction cooktop recently. As a scientist, she loves the physics of her new cooktop: an electric current runs through a metal coil beneath the glass surface and creates an electromagnetic field. As the science nerds at food site Serious Eats observe, “This creates atomic-level vibrations in your pan, which causes friction and heats the pan from the inside out.” The stovetop does not heat up, but your pan does. But the pan must be magnetic, ruling out glass, aluminum and copper.
According to the U.S. Department of Energy, induction is three times more efficient than gas: my sister loves its speed of cooking, and the ease of cleaning one piece of glass versus my gas range’s cast iron grates.

But crunch time came when I examined our old farmhouse’s electrical panel and realized the two available fuses in the old box — which have sat vacant since we switched to gas — total 30 amps, a volume of flow too low for an induction range. So, we bought another gas range.
First came calibrating the new oven, learning its idiosyncrasies. One way to calibrate is to put a thermometer in the oven and turn the oven on. Start at 200 F, then increase the setting by 50-degree increments: at each setting, note the actual temperature versus the temperature you set it at. I did this half a dozen times, through bake/roast settings with/without convection, with/without steam. My new oven routinely runs 25 degrees lower than the display — easy enough to compensate for.
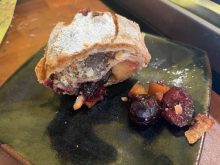
Of course the other way to learn an oven is to bake with it. During December that’s what I did, a holiday elf making edible gifts for friends and family. First we eat some tarts, then we discuss other tools and techniques.

Mincemeat tarts
My mom loves raisin pie, a staple from her Depression-era Prairie childhood — and mincemeat pie is nothing but raisin pie dressed up for town. I add Spanish solera-aged brandy in memory of my Spanish-speaking father-in-law, a dignified caballero who mixed a mean pisco sour after living for years in the high mountains of Chile. Method makes a good tart great: pay close attention to the pastry-making instructions for a crisp, tender, flaky crust. Makes dozens.
Mincemeat:
- 2 c. raisins
- 2 c. dried cranberries
- 2 c. currants
- 6 apples, peeled and minced
- 6 pears, peeled and minced
- 2 c. sugar
- 2 c. brown sugar
- 1 orange, zest and juice
- 1 Tbsp. cinnamon
- ¼ tsp. cloves
- ½ tsp. allspice
- ½ tsp. nutmeg
- 1 Tbsp. powdered ginger
- 1 c. spiced rum or brandy
- 1 c. pear or apple cider
Pastry:
- 2 c. all-purpose flour
- A pinch of salt
- ½ c. butter, chilled and cubed
- ½ c. shortening or lard, chilled and cubed
- 2/3 c. cold water
- Icing sugar for dusting
A week ahead, combine mincemeat ingredients, cover and chill, stirring daily.
Combine flour and salt, then cut in butter and shortening or lard, using knives or a pastry cutter, until mealy. Add water to cohere, then fold in half, turn the dough 90 degrees, and fold again. Repeat several times until dough changes texture, then wrap and chill for at least an hour. Remove from fridge, let come to room temperature, and roll out to desired thickness. Cut into rounds to fit tart pans or muffin cups, then cut slightly smaller rounds for tops.

Set oven at 375 F. Fit pastry rounds into pans, chill, then fill with mincemeat, cover each with pastry top, press down gently, and bake for about 30 minutes, until golden. Remove immediately from pan, using the tip of a small sharp knife to loosen any spilled filling, cool, and dust with icing sugar. Refrigerate extra mincemeat for another use.