
A gardener recently told me about his disappointing and frustrating experience with a clematis. “It suddenly collapsed after appearing in good health earlier.” He continued, “It’s as though someone had cut off the entire plant at ground level, when in fact such wasn’t the case. What happened?” he asked of me. I told him: “Sounds to me that it could be the little-known but notorious clematis wilt,” so that’s the opening subject just a tad bit along.
A Grainews reader writes: “Hi. What do you recommend for treating cabbage that is becoming infested with beetles that are eating all the plants? Help! Liz.”
Read Also

Maintain motion to ease joint stiffness
As we proceed into colder, drier temperatures, it’s common to hear reports of more joint stiffness and pain, athletic therapist Kathlyn Hossack writes.
Also, am sending a big hello to Myrtle Hutlet at Cypress River, Manitoba who telephoned about blossom end rot on tomatoes.
Yours truly has gathered and compiled numerous ideas, formulas and recipes from various sources including my own from throughout many years. Suggestions provided may work well for some gardeners and perhaps only partially at best for others. The intent is to always lending a helping hand if we can, do no harm to the land or environment and practise natural gardening as much as possible.
There’s a lot to cover in this class so let’s assemble as though we are teachers and students learning together from each other. Invite a reading buddy to join us so that others facing similar challenges may benefit from our sharing. Here comes my tip of the hat and that means everyone’s welcome as always.
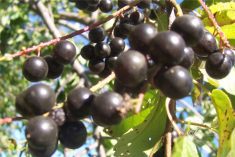
Clematis Wilt! How can we control it?
Nothing is “so-called” cheap anymore (including clematis) at garden centres and greenhouses. After all, owners and managers of such businesses are entitled to a reasonable living and income too. And let’s not complain about prices for fresh-from-the-earth veggies, herbs, flowers, fruit, honey, home baking and who knows what else at local-area farmers’ markets. But hey, I’m supposed to be talking about clematis wilt.

It’s an extreme disappointment when a clematis suddenly collapses while in full bud and not because of a mistakenly applied hoe or pruning shears. What it is and how it can be prevented has been debated for years by clematis experts and growers, yet none of their discussions have reached a definite conclusion. However, all is not lost when such wilt happens. Roots usually remain in full vigour and are not affected by upper growth that’s wilted. They are still capable of sending up new strong shoots, especially if the vine was planted deeply with a few inches of some stems placed below the soil. If clematis flower buds, leaves and stems are ever noticed hanging limply down, the entire plant should be cut off at ground level at once as it is too late to spray the vine. Drastic measures are needed or the plant will be lost. Remove and burn the affected foliage. Keep the roots moist and cool. Feed the roots weekly with plant food for vining plants and within a few weeks some new shoots should appear with the clematis none the worse from the wilt attacker. Be aware though that the roots could also remain dormant for several months without any growth happening and even until the following season, so do not despair. On very rare occasions any clematis can wilt two or three times and eventually outgrow it.
There have been many theories regarding clematis wilt over the years but most scholars agree that a fungus is responsible. Another theory is that wilting seems to occur during periods of excessive high humidity. Growth is so fast that plant stems cannot cope with a sudden rush of sap, then get overloaded and seize up. The more stems coming up from the root system — the better — improving chances for survival. One grower has offered this suggestion. He recommends the following especially on well-drained, sandy and dry soils. Before planting, bury a container beneath the selected site about two feet down. Fill it with stones, top it off with water and cover over with moistened peat moss. Then, plant your clematis in the normal way on top with good potting soil. The plant will thus have a constant supply of water and hopefully be immune to clematis wilt. It’s been noticed that gardeners living near rivers or other bodies of water can grow magnificent clematis.
Problems with flea beetles, butterfiles and worms on cabbage
Elizabeth Tymchuk writes in an email: “I live in the Parkland… some 45 miles northeast of Dauphin in Rorketon, Man. Normally we’ve used potato dust on the cabbages and in the last several years we’ve used flour. We are very dry in this area so anything powdery just blows off and the rape beetles just destroy the leaves. Liz.”
Pest controls from various gardeners and sources
If you’ve never tried any of the following previously, remember that trial and error apply. Easy does it, so if at first you don’t succeed, try another formula.
Sage tea and powdered sage sprinkled and dusted in that order over radishes, broccoli, cabbage, cauliflower and brussels sprouts repel flea beetles and cabbage butterflies. Apply or drape a lightweight floating row cover (available at garden centres) or use old thin transparent curtains draped over cole crops as a barrier to egg-laying cabbage moth butterflies and flea beetles. Fasten down the outer edges at soil level to deny entry of flying pests. Spray cole crops especially when worms are small with Bacillus thuringiensis BTK Biological Insecticide, available at garden centres. Be sure to direct the spray on both sides of leaves. Once ingested the worms die from the BTK about 24 hours later. Other organic methods to control cabbage worms follow. Dust cole crop leaves with a mixture of one-half cup of salt combined with one cupful of flour. Apply this blend after each rainfall or mist plants first with water. Sprinkle dry baking soda on cabbages early in the morning. Once the dew dissolves the baking soda — pests and worms will be gone. Or, try sprinkling cornmeal on cabbages to eliminate worms.
Tomato blossom end rot and disease fighters
Give tomato plants extra protection. There are several ways. Mix one litre of soured skim milk with a litre of warm water and spread some on the ground around each plant. Or, you can mix six tablespoons of powdered skim milk with four litres of warm water and sprinkle from a watering can over each tomato plant during the early part of the day, letting it drip to the soil. What else can gardeners do to manage tomato plant diseases? Prune out bottom leaves so none ever touch the soil by removing all foliage on staked tomatoes as much as 12 to 18 inches or more above ground level. This allows for airflow and flower pollination and reduces soil from splashing onto leaves during rain.
You may want to try an ASA tablet and water spray applied during the early part of the day onto tomato foliage, so it drips down to the soil. (Generic name is salicylic acid) — Aspirin is a national brand. ASA solution can help prevent and ward off blight and fungal diseases from wiping out a tomato crop. Repeat the ASA spray in about two weeks. Next spring, soak tomato seeds for 20 minutes in a bit of ASA and water before planting them.
The solution is made by stirring one or two 325-mg ASA tablets into four litres of water. My suggestion is to start with one ASA tablet and work up to two tabs if necessary. Depending on your tomato varieties you may notice a thicker tomato leaf here or there while some tomato leaves may also curl. Another option is wettable sulphur spray that can also be used for tomato disease prevention. Follow directions on the label. Sulphur is available at garden centres. Avoid using cold water when mixing a spray as it can set tomato plants back by as much as eight hours. Remember — fruits of the vine are known as the shivering giant. Finally! Between mid- and end of August it’s time to pinch out newly developing tomato blossoms. Also remove the highest top growth and side growth of each tomato plant to direct energy into green and ripening fruits that are already formed.